Shop at The Natural Remedy
for top shelf BC Buds
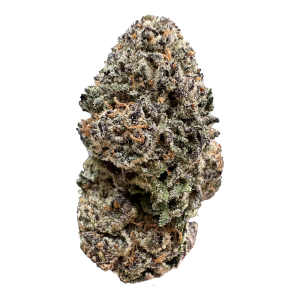
In the world of cannabis concentrates, Honey Oil is a legend. Before the modern era of live resin, diamonds, and rosin, Honey Oil was the gold standard—literally. Named for its translucent, amber-gold appearance and viscous, sticky texture, this concentrate is cherished for its potency (often 70–80% THC) and its versatility. It can be dabbed, painted onto joints (“twaxing”), or eaten.
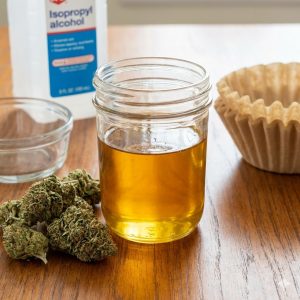
The QWISO Toolkit: Turning premium flower and alcohol into golden oil requires the right setup.
While commercial Honey Oil is often made using closed-loop BHO (Butane Hash Oil) or CO2 systems, you can achieve similar results at home using a method known as QWISO (Quick Wash Isopropyl) or QWET (Quick Wash Ethanol).
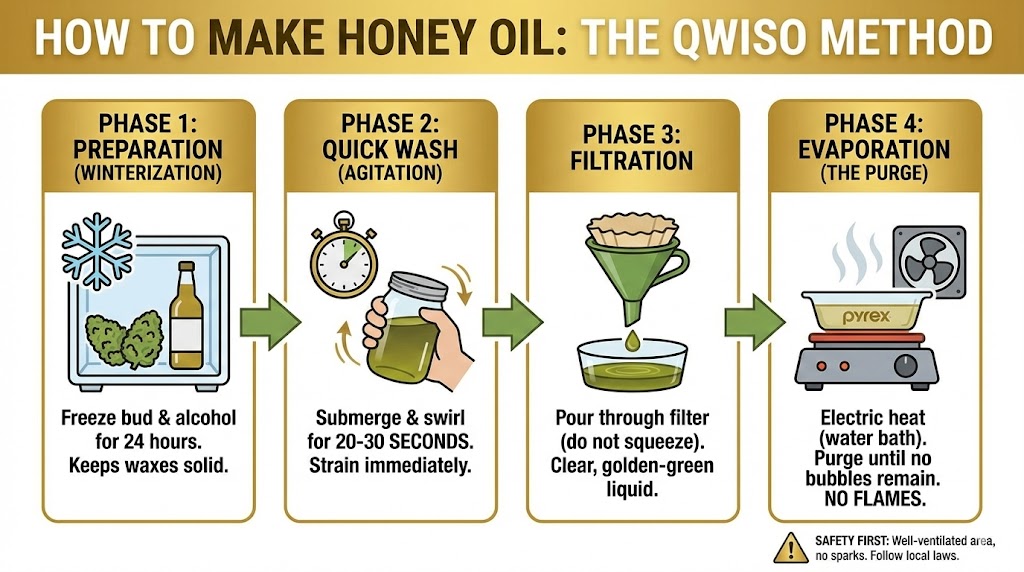
This guide will walk you through the science, safety, and steps to producing golden, translucent oil, rather than the dark, tar-like substance often associated with homemade extracts (RSO). The secret? Temperature and timing.
Honey Oil is a form of Hash Oil. It is a solvent-based extract where the cannabinoids (THC/CBD) and terpenes are stripped from the plant material using a solvent (alcohol or gas), which is then evaporated, leaving behind a pure, sticky resin.
The distinction between “Honey Oil” and “Rick Simpson Oil” (RSO) or “Cherry Oil” lies in the quality and the wash time:
Honey Oil: Golden, translucent, and cleaner. Made using a “Quick Wash” method to avoid pulling chlorophyll and plant waxes.
Cherry Oil: Reddish/Maroon. Slightly longer wash or filtration, pulling some anthocyanins.
RSO (Black Oil): Dark, opaque, and tar-like. Made with a long soak that pulls everything—chlorophyll, fats, and lipids. Best for medicinal oral use, not smoking.
To make Honey Oil, we want the trichomes, not the plant matter.
For home extraction, we recommend the Alcohol Wash method over Open Blasting (BHO).
Safety: BHO requires blasting butane gas into a tube. Without a closed-loop system, this is extremely dangerous and a primary cause of home extraction explosions.
Accessibility: High-grade alcohol is easier to source and handle than refined butane canisters.
We will focus on the QWISO/QWET Method. This uses frozen alcohol to strip the THC crystals off the bud instantly, minimizing the extraction of green chlorophyll.
Before you begin, gather these supplies. Do not improvise with the solvent.
Cannabis: 7–14 grams of dried flower (or high-quality trim). The better the input, the better the output (“Fire in, fire out”).
Solvent: High-percentage alcohol.
Best: 190 Proof Grain Alcohol (Everclear) – Food safe.
Good: 99% Isopropyl Alcohol – Effective, but requires thorough purging to ensure no residue remains.
Avoid: 70% Rubbing Alcohol (too much water) or any alcohol with added scents/colors.
Two Mason Jars: Glass jars with lids.
Freezer: Essential for the “Winterization” process.
Coffee Filters: Unbleached is preferred.
Mesh Strainer: Stainless steel.
Pyrex Dish: A flat, glass baking dish for evaporation.
Electric Heat Source: A heating pad, electric griddle, or coffee warmer. NEVER use a gas stove or open flame.
Razor Blade: For scraping up the final product.
Safety Gear: Safety glasses, gloves, and a fan for ventilation.
The biggest mistake beginners make is doing this at room temperature. Alcohol is a polar solvent; at room temperature, it acts like a magnet for chlorophyll (the stuff that makes plants green and taste like grass). If you want Honey Oil, you need to freeze everything.
Bust the Bud: Break your cannabis into popcorn-sized nugs. Do not grind it into a powder; grinding exposes too much cell wall, which leads to green, bitter oil.
Freeze the Green: Put your cannabis in a Ziploc bag or jar and place it in the freezer.
Freeze the Solvent: Put your bottle of Alcohol in the freezer.
Wait: Leave them there for at least 24 hours.
Why? When the plant waxes and lipids are frozen, they solidify and are less likely to dissolve into the alcohol. This ensures you only strip the golden trichome heads.
This is the most critical step. If you soak it too long, you make RSO. If you wash it quickly, you make Honey Oil.
Setup: Set up your workspace in a well-ventilated area (outdoors, a garage with the door open, or under a powerful range hood). No cigarettes, no candles.
The Mix: Take your jars out of the freezer. Pour enough cold alcohol over the cannabis to submerge it completely.
The Agitation (20-30 Seconds): Screw the lid on tight. Swirl and shake the jar gently for only 20 to 30 seconds.
Note: The alcohol is dissolving the trichomes immediately. You do not need minutes. You need seconds.
The Strain: Immediately pour the mixture through the metal mesh strainer into the second jar to separate the plant matter from the liquid solvent.
Pro Tip: You can save the wet plant matter for a second wash (which will be lower quality/darker) or discard it.
Now you have a jar of golden-green liquid. We need to polish it.
Setup the Filter: Place a coffee filter inside your mesh strainer or a funnel, positioned over your clean Pyrex dish (or a clean jar if you aren’t ready to evaporate yet).
Pour: Slowly pour the alcohol solution through the coffee filter.
Patience: Let gravity do the work. Do not squeeze the coffee filter; squeezing forces plant waxes through and makes the oil cloudy.
Result: The liquid in the dish should be a clear, golden-yellow color. If it’s dark green, you shook it too long (it’s still potent, just less tasty).
Now we must remove the alcohol to leave only the THC oil. Safety is paramount here. Alcohol fumes are heavy, flammable, and invisible.
The Water Bath (Double Boiler):
Fill a pot with water and place it on an electric hot plate or stove (Low/Medium heat).
Place your Pyrex dish (containing the liquid) on top of the pot. The steam from the water will heat the glass dish gently.
Ventilation: Have a fan blowing gently across the liquid (not directly into it, just creating airflow) to push fumes away.
Watch it Boil: The alcohol will begin to bubble and evaporate. As the level drops, the liquid will thicken.
The Finish Line: When the liquid stops bubbling vigorously and looks like a still, golden sludge, remove it from the heat.
Crucial Note on Isopropyl: If you used Isopropyl, you must ensure it is 100% gone. Inhaling ISO fumes is dangerous. When the large bubbles stop, you are left with oil, but microscopic solvent is still trapped.
The Final Purge: Place the Pyrex dish on a coffee warmer or a heating pad (set to low, around 100°F – 110°F) for several hours. You will see tiny bubbles rising to the surface. This is the residual solvent escaping. The oil is ready when it is completely smooth and no more bubbles appear when heated.
Cool Down: Let the dish cool to room temperature. The oil will harden into a tacky, thick consistency.
Scrape: Use a clean razor blade to scrape the oil from the glass. This can be sticky business.
Tip: If it’s too sticky, put the dish in the freezer for 5 minutes. The oil will become brittle and snap off the glass easily (shatter consistency).
Store: Transfer the collected oil into a small silicone container (for dabbing) or a glass jar. Parchment paper also works for short-term storage.
Follow the Golden Rules: Freeze your inputs, wash quickly, and purge safely to achieve translucent oil.
Why is my oil cloudy? Cloudiness usually means water got into the mix (either from condensation or using 70% alcohol) or you squeezed the filter. It will crackle when smoked but is safe.
Why is my oil green/black? You soaked it too long or didn’t freeze your materials. The green is chlorophyll. It will taste harsher but the potency is likely still very high.
Why is it sparking when I smoke it? STOP. Sparks mean there is still solvent trapped inside. Put the oil back on a low heat source (heating pad) and let it purge for another hour until smooth.
Congratulations, you have successfully concentrated your cannabis! Honey Oil is incredibly versatile:
Dabbing: This is the most popular method. Use a dab rig or a nectar collector. The flavor should be pure and the effects immediate.
The “Twax” Joint: Smear a thin line of oil on the outside of a joint or cigarette, then roll it in kief. This burns slowly and adds a massive kick.
Top a Bowl: Put a small drop on top of a bowl of flower. Hold the lighter above it so it melts into the bud before igniting.
Edibles: Because the evaporation process involves heat, the oil is likely partially decarboxylated. However, for maximum edible potency, you should heat the finished oil at 240°F for 20 minutes to fully activate the THC. It can then be mixed into butter or oil for cooking.
Making Honey Oil at home is a rewarding process that turns a pile of flower into a potent, golden elixir. It combines chemistry with culinary art. The difference between “swamp water” and “liquid gold” is simply patience—freezing your material and keeping your wash times short.
Remember, the goal is quality over quantity. A fast wash yields less oil, but the oil it yields will be sweet, smooth, and true to the strain. Treat your solvents with respect, prioritize safety, and enjoy the fruits of your labor.
Looking for premium inputs? Great oil starts with great flower. Browse our selection of High-THC Flower perfect for extraction. Don’t want the hassle? Shop our ready-made Concentrates & Vapes.
No account yet?
Create an Account
